


Update: This article is outdated. Ubuntu Budgie 21.10 is now the current version and I have upgraded to it and suggest you do the same. Most of the info below still applies to 21.10.
I recently decided to give Ubuntu Budgie a try. Here are a few notes documenting my experience setting up Ubuntu Budgie 21.04 to dual-boot alongside Windows 10 on an older i7 PC with dual 4K monitors (spoiler: I found my current graphics card is incapable of running dual 4K monitors at 60 FPS so I'm stuck with 1920x1080 until I decide to splurge on a new graphics card).
Ubuntu Budgie is an official flavor of Ubuntu using the Budgie desktop environment. I chose Budgie because I find the aesthetics very attractive, minimalist and modern. I choose Ubuntu because I'm familiar with it and comfortable with Debian-based distributions and because Ubuntu has a reputation for being stable and easy to work with.
Background Info
Here is some background info that will be helpful to understand going into this:
The difference between BIOS and EFI
Older systems like mine use BIOS. In most modern systems, BIOS has been largely superseded by EFI (Extensible Firmware Interface). EFI systems have a special protected disk partition called the ESP (EFI System Partition). The installer will give a warning if you don't select an EFI partition but you can safely ignore this warning if you have an older system like mine that uses traditional BIOS.
The difference between MBR and GPT disks
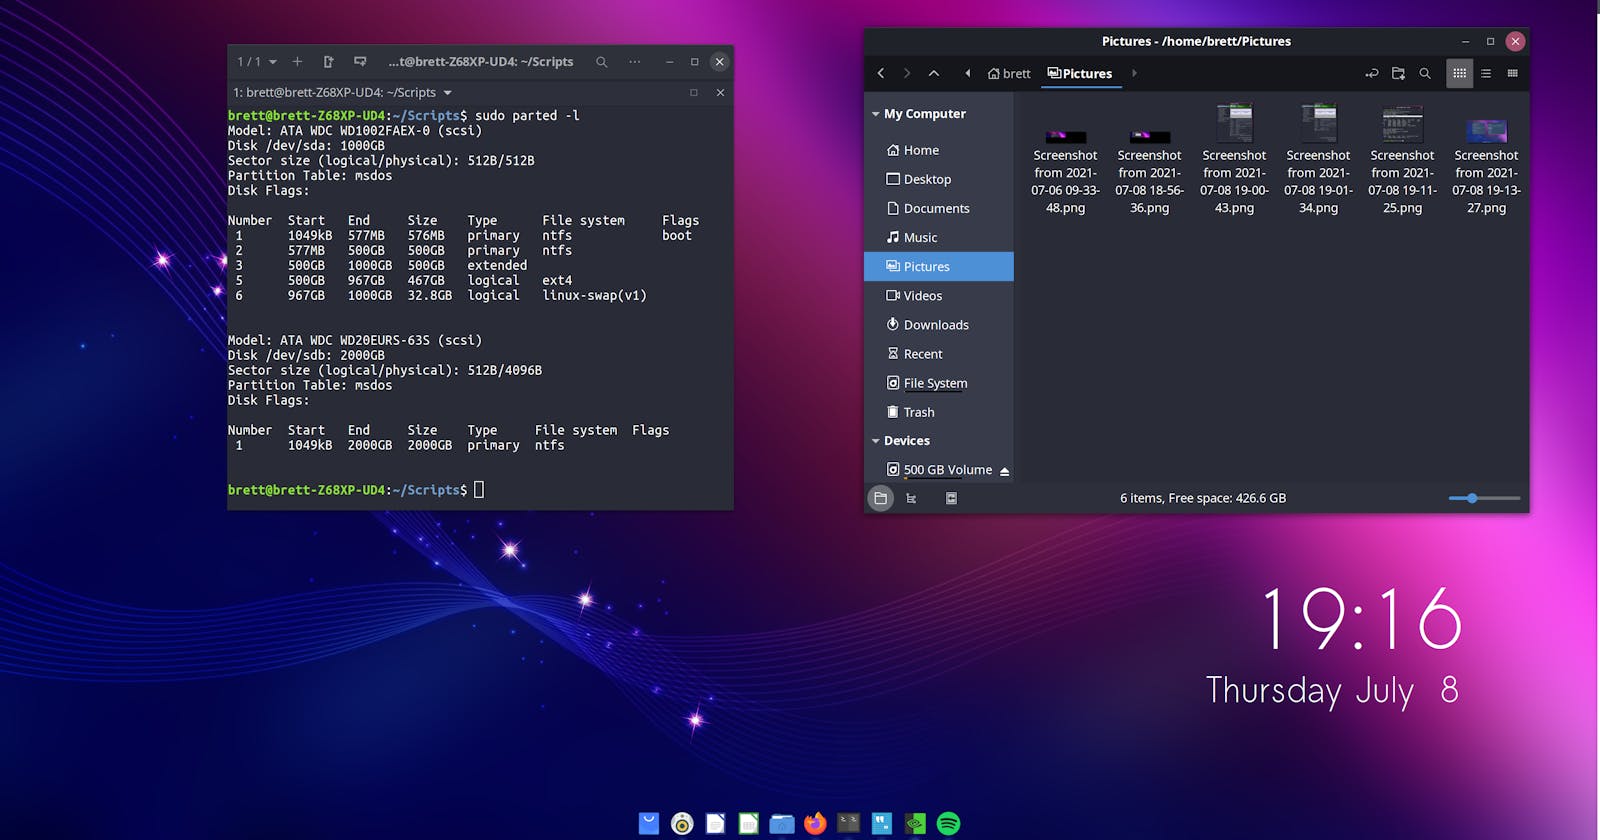
MBR (Master Boot Record) and GPT (GUID Partition Table) are two different ways to partition disks. Older systems like mine are more likely to use MBR (sometimes referred to as msdos). Newer systems or Linux systems typically use GPT. MBR partitions are limited to 2 TB in size. If you have a larger drive, you must use GPT. You can use the command sudo parted -l to see which type you have.
Installation and graphics drivers
Following traditional wisdom, I installed Windows first before installing Ubuntu Budgie.
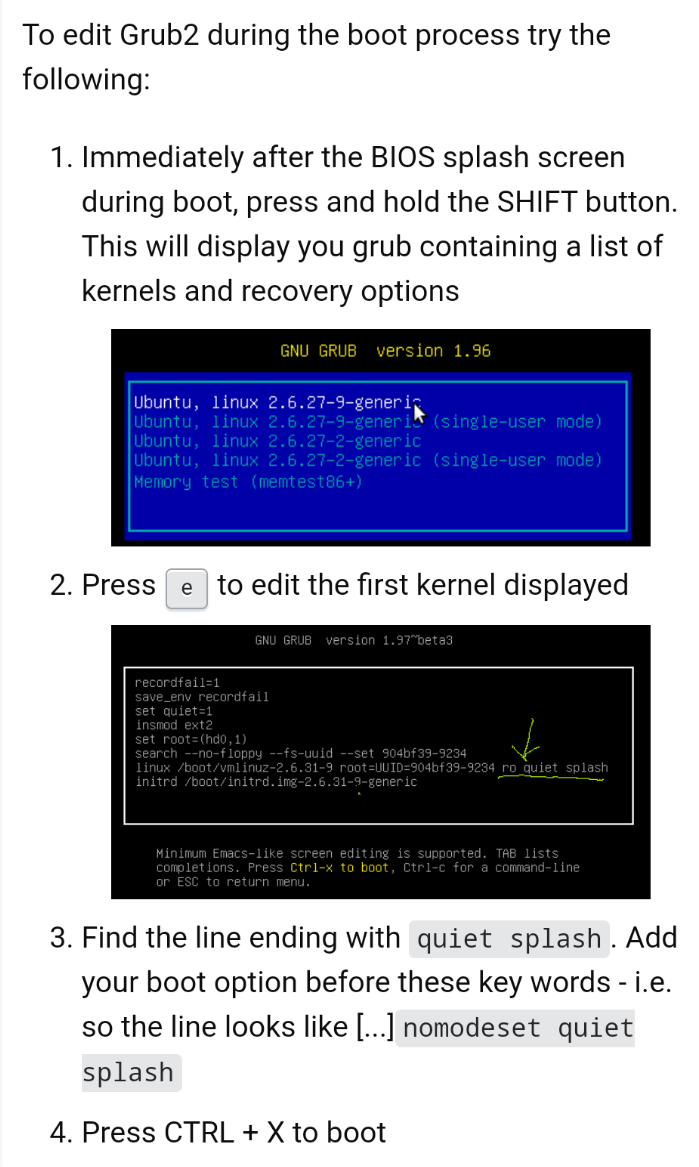
I have an Nvidia GTX 550 Ti graphics card. The live USB installer was initially booting to a blank screen. I had to use the "Safe Graphics" option for the install. Then after installation, my screen was going blank immediately after choosing Ubuntu at the Grub bootloader screen. As a temporary workaround, I edited the Grub to add the nomodeset argument:
Then I was able to boot into Ubuntu Budgie and install updates and additional proprietary drivers. This caused it to install the nvidia-driver-460 by default. Unfortunately after rebooting, I found that it was again booting to a blank screen. After some research I found the fix was to disable my integrated VGA graphics in BIOS. That got me past the blank screen but it was still stuck on a low resolution and not detecting my second monitor. I fixed this by installing the nvidia-driver-390 driver with the command below (which also removes the 460 driver):
sudo apt install nvidia-driver-390
Because I have 4K monitors, everything appeared quite small. I fixed this by increasing the scale to 200% in the Budgie Displays settings.
Vertical Scroll Speed Issue
The vertical scroll is very slow. It's especially notable in web pages. I couldn't find a knob to control it in my xinput settings, but I did find a way to do it in Firefox at least, where the sluggishness is most noticeable:
Go to about:config
Increase vertical factor from 200 to 400:
mousewheel.system_scroll_override_on_root_content.vertical.factor
and then you have to enable the scroll setting override by changing this to true:
mousewheel.system_scroll_override_on_root_content.enabled
Mouse Pointer Speed issue
I also increased the pointer speed in the Budgie Mouse settings, but I found with 4K resolution it was still too slow even with the max setting. First I tried adjusting the pointer control acceleration and threshold, but it didn't have any noticeable effect. TLDR I wrote the scripts below to tweak the mouse pointer settings:
#!/bin/bash
DEVICE="Logitech Wireless Mouse"
xset q | grep -A 1 Pointer
xinput list-props "$DEVICE" | grep "Accel Speed"
xinput list-props "$DEVICE" | grep "Coordinate Transformation Matrix"
#!/bin/bash
DEVICE="Logitech Wireless Mouse"
if [ "$#" -ne 4 ]; then
    echo "usage: $0 <xsetmacceleration> <xsetmthreshold> <libinputaccelspeed> <transformxy>"
    echo "e.g. $0 1/1 4 1 2"
    exit 1
fi
xset m $1 $2
xinput set-prop "$DEVICE" "libinput Accel Speed" $3
xinput set-prop "$DEVICE" "Coordinate Transformation Matrix" $4, 0, 0, 0, $4, 0, 0, 0, 1
source GetMouseSpeed.sh
Demo:
brett@brett-Z68XP-UD4:~/Scripts$ ./GetMouseSpeed.sh
Pointer Control:
  acceleration:  1/1    threshold:  4
    libinput Accel Speed (301):    1.000000
    libinput Accel Speed Default (302):    0.000000
    Coordinate Transformation Matrix (156):    3.000000, 0.000000, 0.000000, 0.000000, 3.000000, 0.000000, 0.000000, 0.000000, 1.000000
brett@brett-Z68XP-UD4:~/Scripts$ ./SetMouseSpeed.sh
usage: ./SetMouseSpeed.sh <xsetmacceleration> <xsetmthreshold> <libinputaccelspeed> <transformxy>
e.g. ./SetMouseSpeed.sh 1/1 4 1 2
brett@brett-Z68XP-UD4:~/Scripts$ ./SetMouseSpeed.sh 1/1 4 1 2.1
Pointer Control:
  acceleration:  1/1    threshold:  4
    libinput Accel Speed (301):    1.000000
    libinput Accel Speed Default (302):    0.000000
    Coordinate Transformation Matrix (156):    2.100000, 0.000000, 0.000000, 0.000000, 2.100000, 0.000000, 0.000000, 0.000000, 1.000000
Note: I don't believe the xset m <acceleration> <threshold> actually has any effect. The latter two arguments definitely do though (libinput acceleration speed and x & y coordinate transform)
Make it permanent
export PATH=~/Scripts:$PATH
echo "!-1" >> ~/.bashrc
SetMouseSpeed.sh 1/1 4 1 2.2
echo "!-1" >> ~/.bashrc
Mouse lag fix
In addition to being slow, the mouse cursor appears laggy with 4K resolution. As I later found out, this probably had a lot to do with the low framerate I was getting trying to run 4K through a DVI port. More on that in the next section.
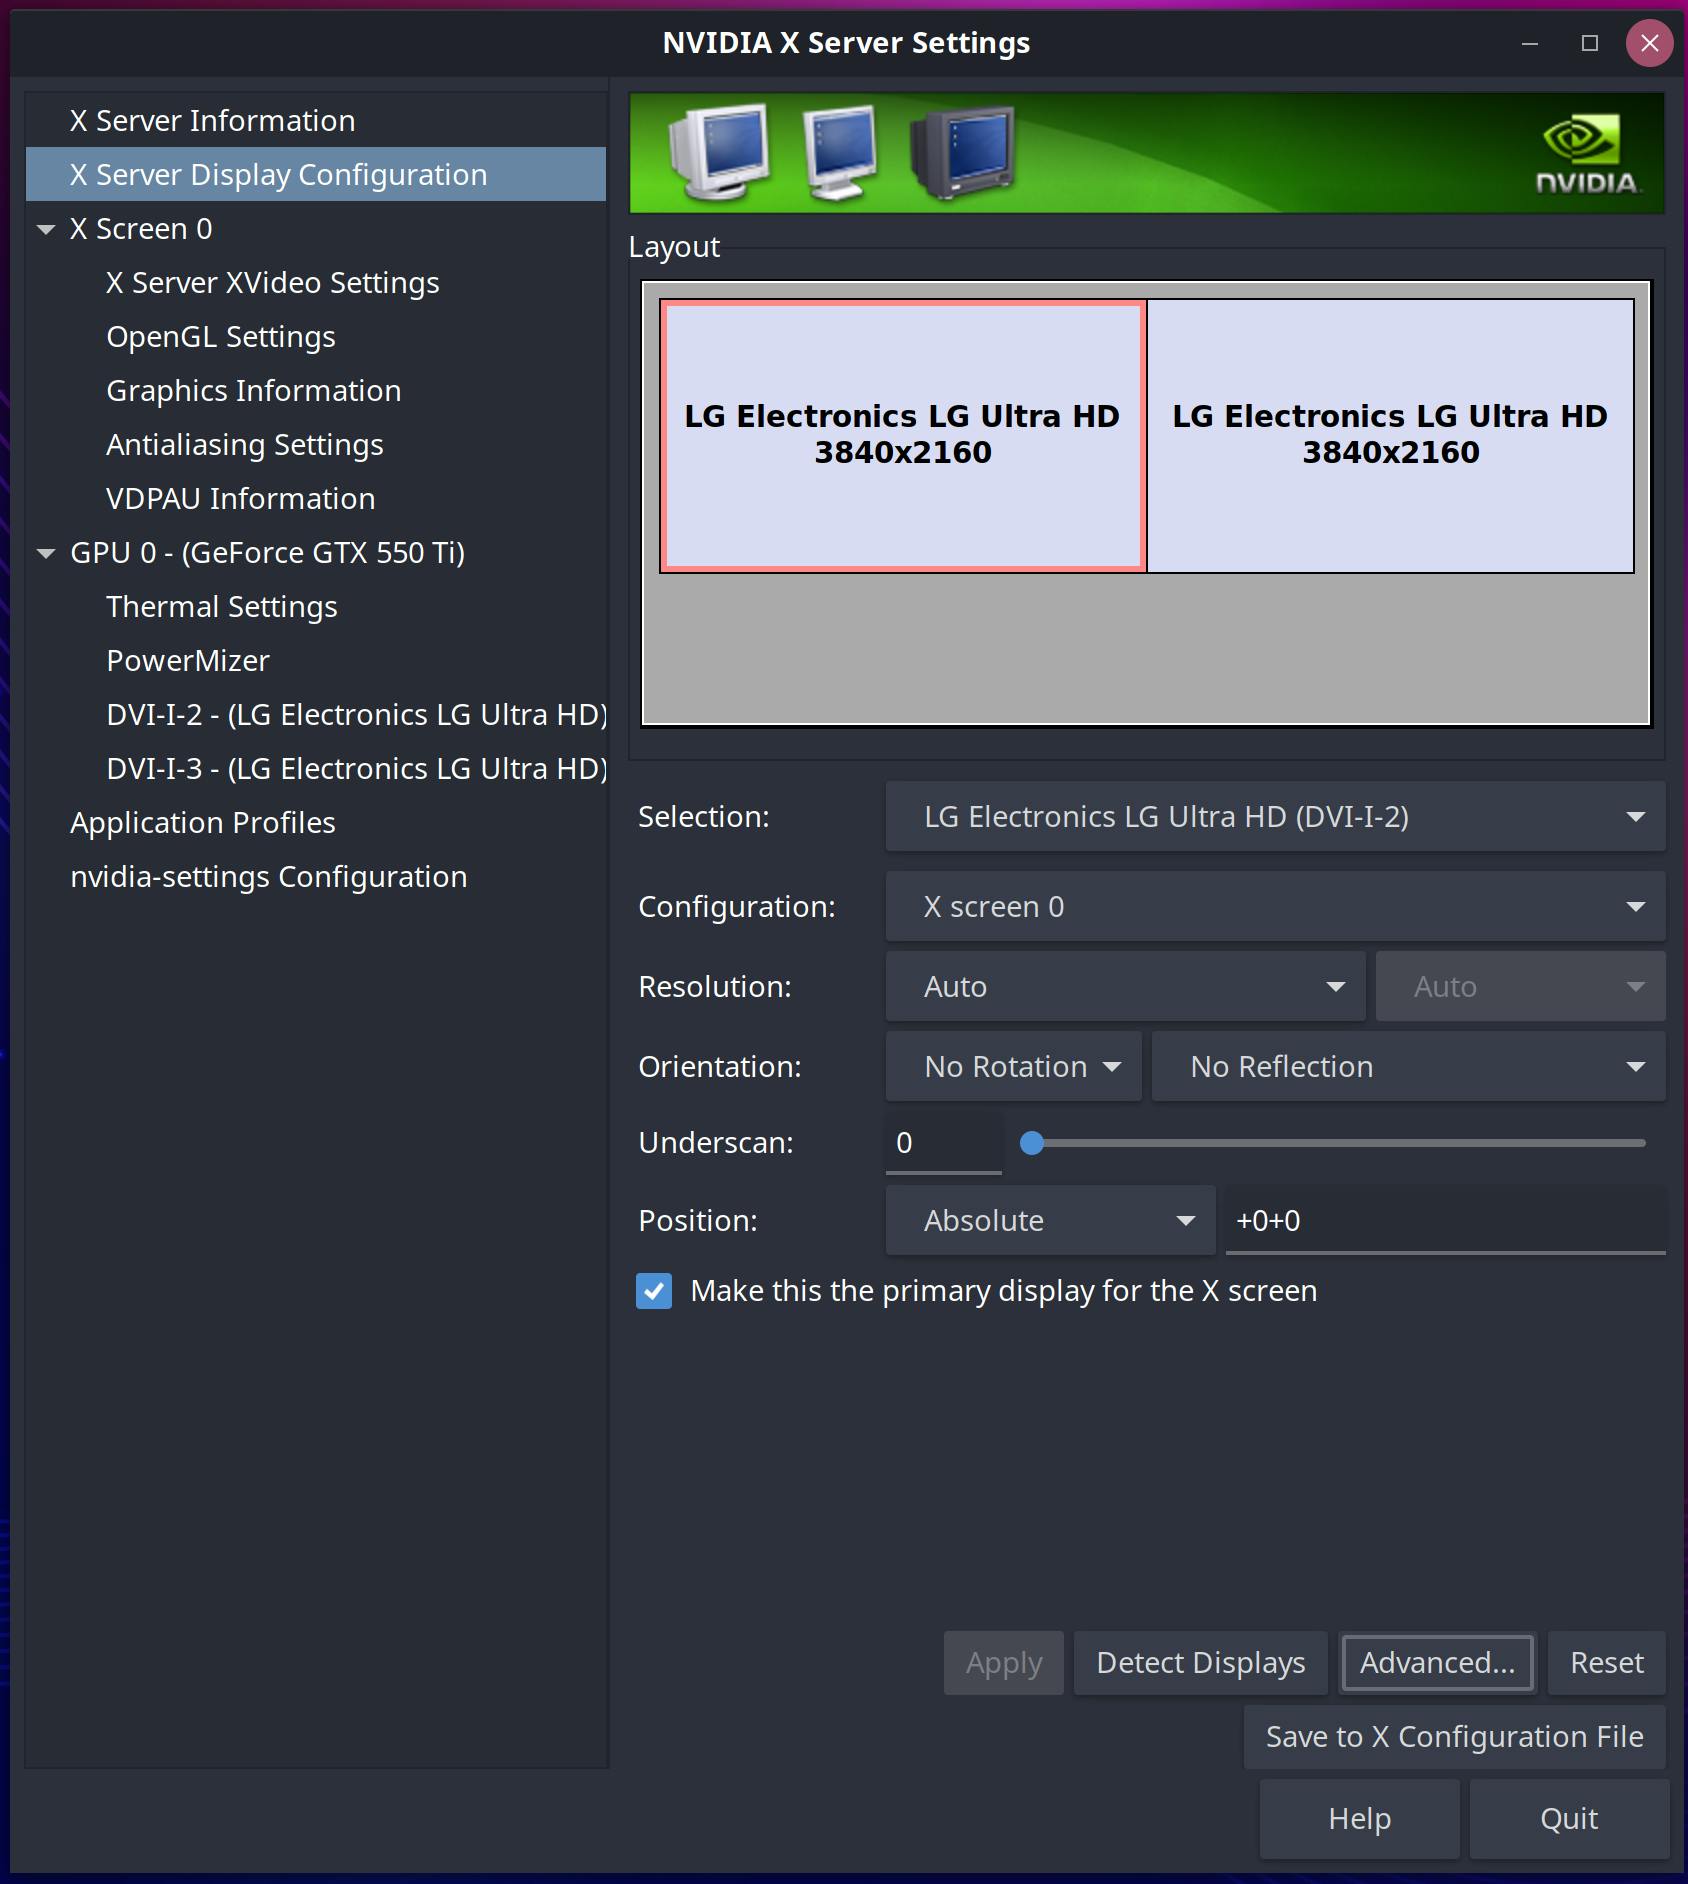
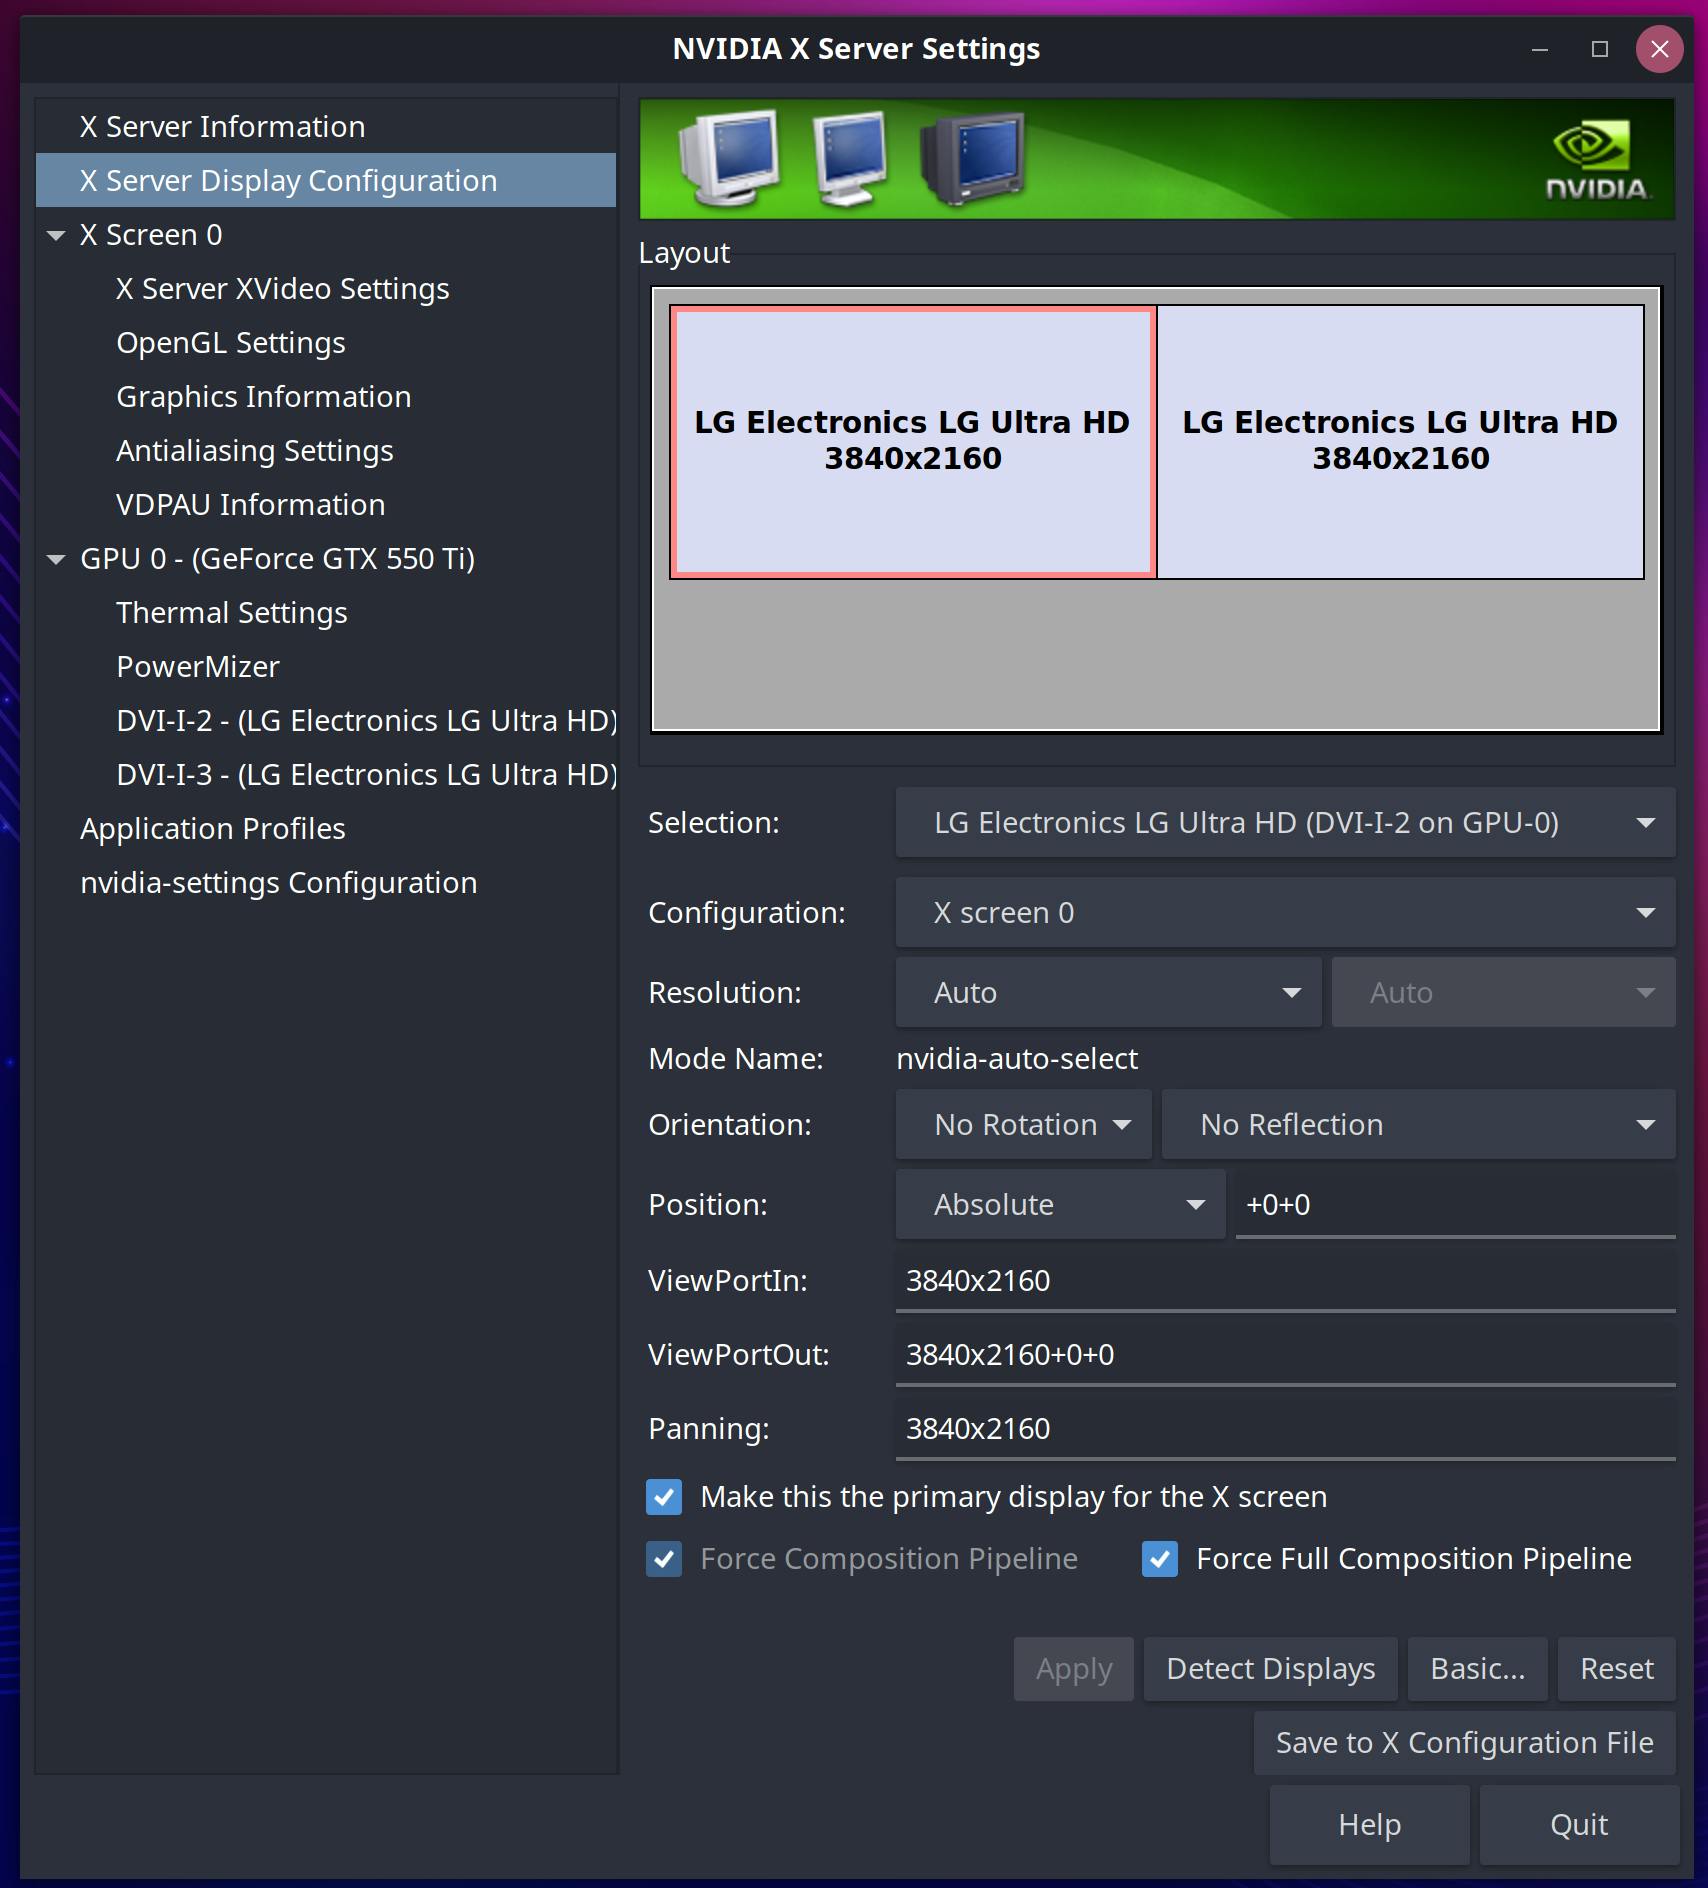
Anyway I found it can be improved somewhat by changing the following in NVIDIA X Server Settings: X Server Display Configuration -> then for each monitor -> Advanced -> [✓] Force Full Composition Pipeline.
Requirements for dual 4k monitors
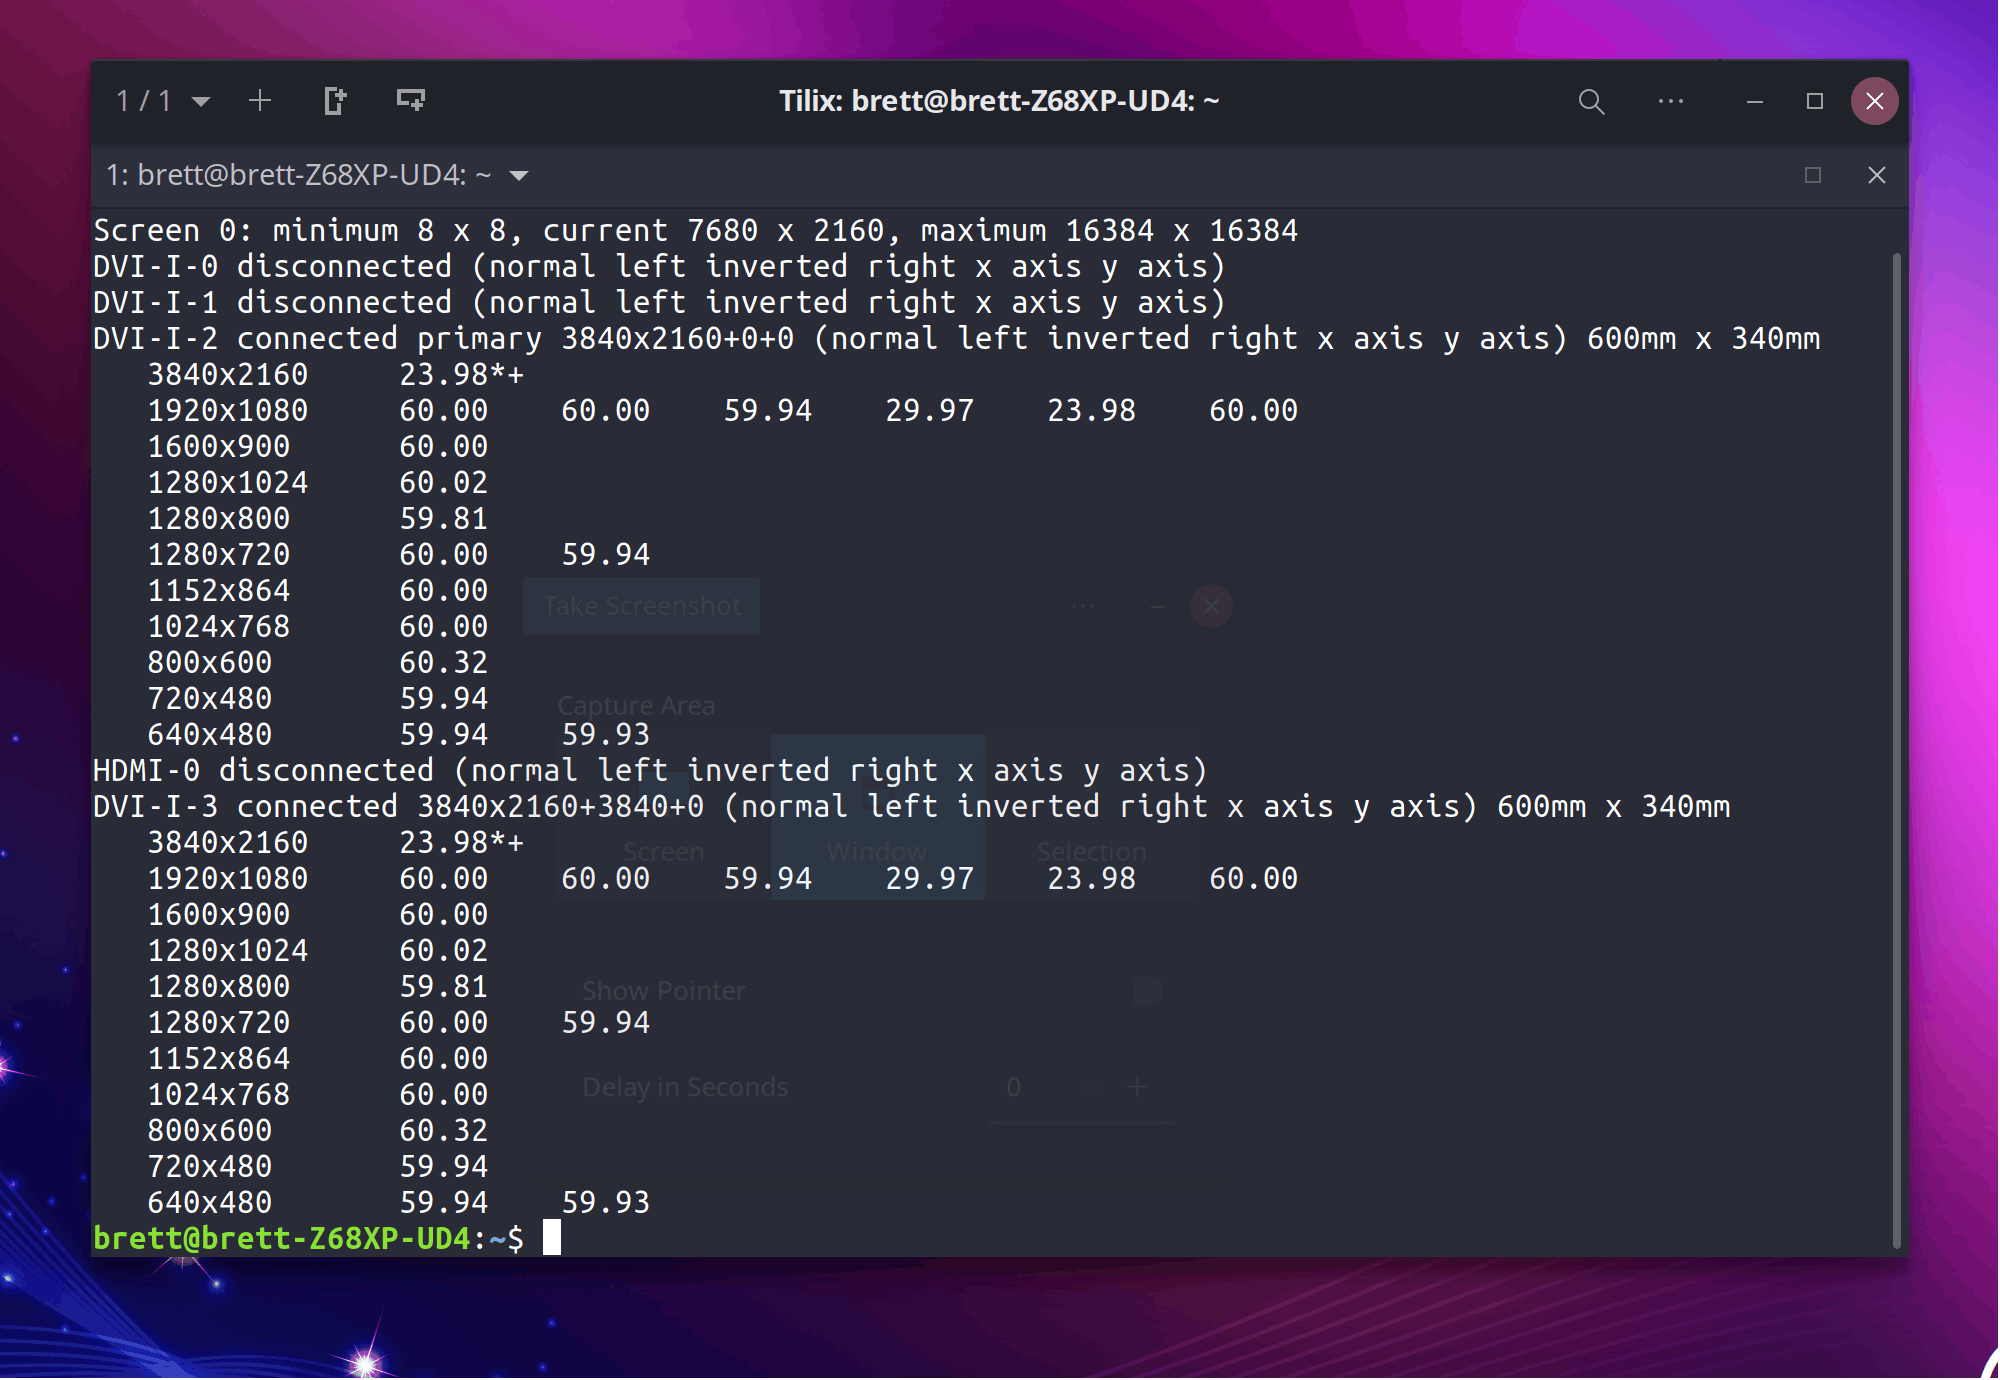
Unfortunately I found that my graphics card (Nvidia GTX 550 Ti) is incapable of driving dual 4K monitors at 60 FPS, due to the limitations of DVI ports. In fact it was running at a mere 23.98 FPS, according to the xrandr output:
The reason is due to my graphics card which only has two DVI ports. A single DVI port doesn't have enough bandwidth to run 4K at 60 FPS. It's possible with two DVI ports, but I'm trying to run not one but two 4K monitors. These days the newest cards have HDMI 2.1 and DisplayPort 1.4b ports that can deliver 4K to dual monitors without issue.
So I'm in the market for a new graphics card. I'm considering an AMD Radeon 6800. Unlike NVidia, AMD graphics cards are supported by the Linux kernel out of the box without any need for proprietary drivers.
Until I can get a new graphics card, I've lowered the resolution to 1920x1080 at 60 FPS and changed the scale back to 100%. At this resolution, the mouse pointer speed is fine with the default settings and the GUI is much more responsive.
NTFS mounted read-only fix
I have a second, NTFS-formatted hard drive for storage purposes only. It was being mounted read-only in Linux. I fixed this by disabling Fast Startup in Windows 10. See windowscentral.com/how-disable-windows-10-f..
Drive not auto-mounting fix
Initially my second hard drive was not being mounted automatically. It would only mount to /media/brett/F458A3F358A3B2B2 after going to the Places menu and clicking 'Local volumes -> 2.0 TB Volume'. This was annoying because it makes Rythymbox giving missing files errors, since my music is on that drive. The solution is to add an entry to fstab. Here's how:
For all subsequent intructions, replace F458A3F358A3B2B2 with the UUID of your drive and replace brett with your username.
To find your UUID, run sudo blkid to see the UUID for every device. If you do not know your device name, run sudo fdisk -l and you should be able to figure it out.
To find your username, run whoami. Queue Supertramp-please tell me who I ammmm, who I ammmm, who I ammmm, who I ammmmmmm
Create the mount point (I chose something much shorter than the default, for convenience):
sudo mkdir /data
Create a new permissions group for whoever/whatever should have access to the drive:
sudo groupadd data
Add your account to the group:
sudo usermod -aG data brett
Change the owner of the mountpoint:
sudo chown -R :data /data
Append an fstab entry:
sudo echo 'UUID=F458A3F358A3B2B2 /data auto nosuid,nodev,nofail,x-gvfs-show 0 0' | sudo tee -a /etc/fstab
Before rebooting, test with:
sudo mount -a
Installing Spotify
snap install spotify
Alt + F2 spotify
Just keep hitting Ctrl + until it's big enough to see on 4K monitors.
[✓] Keep in Dock
Installing Audacity
snap install audacity
Installing VIM
sudo apt install vim
~/.vimrc
set smartindent
set tabstop=4
set shiftwidth=4
set expandtab
autocmd FileType make setlocal noexpandtab
syntax enable
set nocompatible
set backspace=2
Installing Sublime Text
(replace 4107 with latest version)
curl https://download.sublimetext.com/sublime_text_build_4107_x64.tar.xz -O
tar xf sublime_text_build_4107_x64.tar.xz
sudo mv sublime_text /opt/
sudo cp /opt/sublime_text/sublime_text.desktop /usr/share/applications/
alias subl='/opt/sublime_text/sublime_text'
echo "!-1" >> ~/.bashrc
Upgrading Sublime Text
(replace 4113 with latest version)
curl https://download.sublimetext.com/sublime_text_build_4113_x64.tar.xz -O
tar xf sublime_text_build_4113_x64.tar.xz
sudo cp -r sublime_text /opt/
rm -rf sublime_text
Installing Beyond Compare 4
curl https://www.scootersoftware.com/bcompare-4.3.7.25118_amd64.deb -O
sudo dpkg -i bcompare-4.3.7.25118_amd64.deb
Installing Git
sudo apt install git
ssh-keygen -t ed25519 -C "bretttolbert@gmail.com"
eval "$(ssh-agent -s)"
ssh-add ~/.ssh/id_ed25519
cat ~/.ssh/id_ed25519.pub
Now copy public key into GitHub account SSH keys.
Plank - app launcher bar
Type Alt + F2 to bring up the command window and type plank and both Plank and Plank Preferences should appear. Click the latter. This will bring up a menu where you can adjust your launcher bar settings, e.g. icon size, which I like to increase to 48 px.
Raven - side menu
Raven is the Budgie vertical side menu with calendar, notifications and more that is toggled by the door icon beside the power icon (top-right). The Raven menu is also toggled with Super + A. (Super being the Windows key).
Final verdict
Despite the hiccups, I'm pleased with Ubuntu Budgie.
Pros
- I like the Tilix terminal emulator because it has tabs and other nice features.
- Nice launcher. This is the first OS with a Mac-OS style launcher that I've actually liked. like the simplicity and minimalism of it. It's also very responsive.
Cons
- My biggest frustration so far is the keyboard lag. Sometimes keyboard works fine but frequently it starts lagging. E.g. I press backspace and nothing happens, keep pressing it and nothing happens, then suddenly it catches up and deletes 100 letters. I haven't figured out how to fix this yet. I'm using a Logitech Wireless Keyboard K270. Lag is most observable when editing text in a webpage, so it could be a combination of keyboard lag and HTTP lag. Also sometimes when I click to focus on a different window like Sublime Text I'm not able to type anything into it even though it appears to have focus. I have to click somewhere else and try giving the window focus again before the keyboard will work.
- I also keep having an issue where Sublime Text freezes and the cursor gets stuck. Have to close the tab and reopen it to fix.
- One annoying issue I haven't been able to solve is sometimes being unable to click the Download button in the Firefox download dialog in Google Drive.